Removing a bathtub drain is a necessary task for deep cleaning, unclogging beyond the trap, or preparing for a replacement. While it might seem daunting at first, with the right tools and a bit of know-how, this can be a straightforward DIY project. Whether your bathtub drain is old and worn or you’re simply looking to update your bathroom’s aesthetics, understanding how to properly remove the drain is crucial. This guide will walk you through each step of the process, ensuring you can confidently remove your bathtub drain.
Armed with patience and the right approach, you’ll find that removing a bathtub drain is not only manageable but also rewarding. Let’s get started on this essential bathroom maintenance task.
Quick Summary: To remove a bathtub drain, you’ll need a drain wrench or pliers. After unscrewing and removing the drain, clean the area thoroughly. For difficult drains, consider seeking help from a professional drain cleaning service.
Why do you need to remove a bathtub drain?
There are a few different reasons why you might need to remove a bathtub drain. Some common reasons include:
- Clogged drain: If your bathtub drain is clogged, removing the drain may be necessary in order to access the clog and clear it out.
- Damaged or worn drain: If the drain itself is damaged or worn, removing it may be necessary in order to replace it with a new one.
- Remodeling: If you’re remodeling your bathroom, you may need to remove the bathtub drain in order to remove the tub itself or to make other changes to the plumbing.
- Leaking drain: If your bathtub drain is leaking, removing it may be necessary in order to repair or replace it.
No matter what the reason, it’s important to remember that removing a bathtub drain is a task that requires some specialized tools and a bit of know-how. If you’re not comfortable tackling the job yourself, it may be best to hire a Dayton plumber to handle it for you.
Gathering the Necessary Tools
Before you begin, make sure you have the right tools for the job. The primary tool you’ll need is a bathtub drain wrench, which is specifically designed to fit into the drain and allow you to turn it without causing damage. Alternatively, needle-nose pliers or a similarly shaped tool can be used for drains with crossbars. You may also need a screwdriver if your drain has a set screw securing it in place.
Having a cloth or some plumber’s putty on hand can also be helpful for cleaning up any residue or sealing the area temporarily if you plan to reinstall the drain after cleaning or maintenance.
Steps to remove a bathtub drain
Here’s a step-by-step guide on how to remove a bathtub drain. We’ll go into more detail on some of the steps after the summary.
- Gather your tools. You’ll need a few different tools to remove a bathtub drain, including a screwdriver, a pair of pliers, a tub drain removal tool, and a flashlight (to help you see what you’re doing).
- Locate the drain cover. The first step in removing a bathtub drain is to locate the drain cover. This will usually be a round or oval-shaped piece of metal or plastic that is located in the center of the tub.
- Remove the drain cover. Once you’ve located the drain cover, you’ll need to remove it. This can usually be done by using a screwdriver to loosen the screws that hold it in place. If the drain cover is difficult to remove, you can try using a pair of pliers to grip the edges and twist it off.
- Use a tub drain removal tool. Once the drain cover is removed, you should be able to see the drain itself. To remove the drain, you’ll need to use a tub drain removal tool. These tools are specifically designed to remove bathtub drains and are typically made of metal with a hook or claw-like shape on one end.
- Remove the drain. To remove the drain, insert the hook or claw of the tub drain removal tool into the drain and twist it to loosen the drain. It may take some force to remove the drain, so be sure to use caution and be careful not to damage the tub.
- Clean and inspect the drain. Once the drain is removed, take a moment to clean any debris or gunk that may have accumulated inside the drain. Then, inspect the drain for any damage or wear. If the drain looks in good condition, you can reuse it once you’ve finished installing the new drain. If the drain is damaged or worn, you’ll need to replace it.
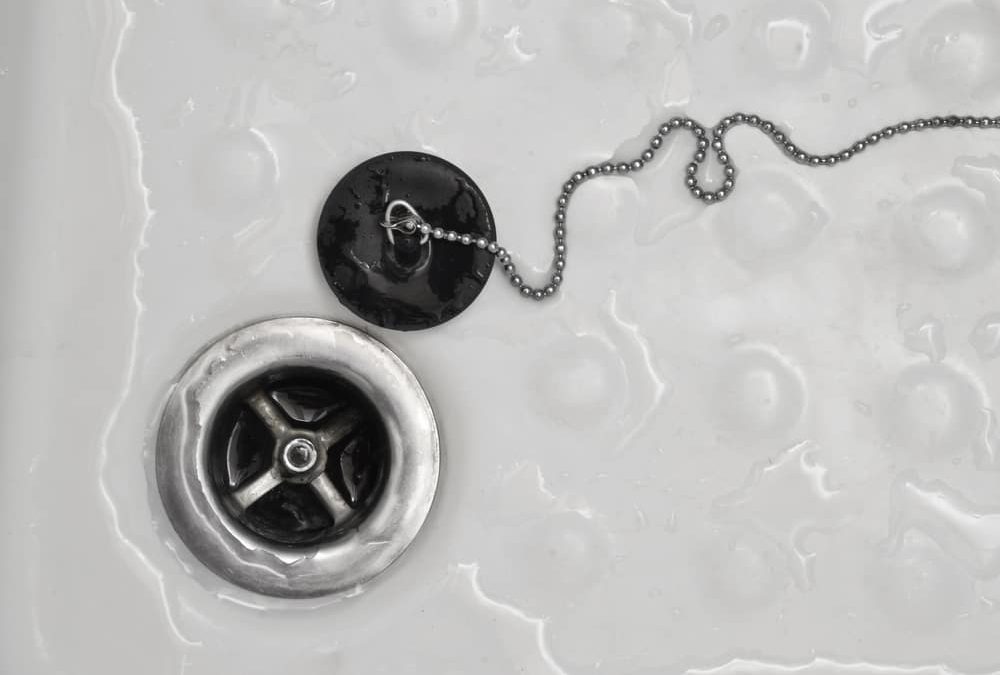
Removing the Drain Stopper
The first step in removing your bathtub drain is to take out the stopper. Many stoppers can be unscrewed by hand or with the help of pliers. If your stopper has a set screw, you’ll find it under the cap or on the side, requiring a screwdriver to remove. Be sure to keep all parts together and in a safe place if you plan to reuse them.
If the stopper is stuck or difficult to remove, applying a penetrating oil can help loosen it. Allow the oil to sit for a few minutes before attempting removal again.
Unscrewing the Drain Flange
With the stopper removed, you can now access the drain flange. Insert the drain wrench or the handles of your pliers into the drain and turn counterclockwise. If the drain is stubborn, applying more penetrating oil and allowing it to soak can make the process easier.
Once the drain flange begins to turn, continue unscrewing it until it’s completely removed from the bathtub. Be cautious not to apply too much force, as this could damage the tub or the drain pipe below.
Cleaning and Inspection
After removing the drain, take the opportunity to clean the area thoroughly. Remove any debris, hair, or buildup that might have accumulated around the drain opening. This is also an excellent time to inspect the drain pipe and surrounding area for signs of wear or damage that might need addressing before installing a new drain or reinserting the old one.
If you notice any damage or if the drain was particularly difficult to remove, consider consulting with a professional to ensure there are no underlying issues that could cause problems in the future.
Conclusion
Removing a bathtub drain is a task that many homeowners can successfully complete with a little preparation and the right tools. Whether you’re cleaning, repairing, or replacing your drain, following these steps will help you achieve your goal safely and effectively. Regular maintenance and cleaning of your bathtub drain can prevent future clogs and ensure your bathroom remains fully functional.
If you’re unable to remove the bathtub drain after following these steps, or if you encounter any complications, it might be time to call in a professional. Dayton Plumbing Services can safely remove the drain without damaging your bathtub or plumbing – so don’t hesitate to reach out. We service the entire Dayton area including Miamisburg, Centerville, Kettering, or Beavercreek with expert drain cleaning services. With the right care and professional support, you can keep your bathtub in excellent condition for years to come.